Understanding WebSocket API in Amazon API Gateway
In this article, I will explain how to create websockets with AWS API gateway in a simple manner.
What are WebSockets?
WebSockets are a communication protocol that provides full-duplex, bidirectional communication channels over a single connection. It is mainly used in realtime applications. A simple usecase is a Chat app. In any chat app, the primary requirement is to send and receive messages immediately. This is not achievable with regular HTTP APIs but is possible with websockets.
Instead of going further into websockets, let's just dive into Websocket API in Amazon API Gateway
API Gateway
There are different types of APIs we can use. The most popular ones are REST and Websocket. REST is a simple request-response type API. In REST, we have methods like GET, POST etc. Websocket, the one in which we are interested in, is also available in AWS API gateway.
Connections
Every API has a URL. API of type REST uses HTTP protocol. So, they start with http:// or https://. Similarly, websockets also have URLs and they start with ws:// or wss://
To understand connections, let's take a look at the below code.
const [webSocket, setWebSocket] = useState(null);

useEffect(() => {
    const ws = new WebSocket(
      `wss://your-websocket-server.com`
    );
    setWebSocket(ws);

    ws.onopen = () => {
      console.log("WebSocket connected");
    };

    ws.onmessage = (event) => {
      console.log(event.data);
    };

    ws.onclose = () => {
      console.log("WebSocket closed");
    };

    return () => {
      ws.close();
    };
  }, [chatId, userId]);
This is a javascript code which is used in frontend. To interact with websockets, a user should first establish a connection to it. As you can see from above code, we are using a useEffect hook. Which means , when the page loads, we can immediately connect to the websocket url.
There are three main methods (more like events) on websocket — onopen, onmessage, onclose. Onopen is for establishing a connection, onmessage is for listening messages from the socket, and finally onclose is for disconnect. Normally when you go away from the webpage in your browser, the onclose will be triggered and then the connection is closed.
Routes
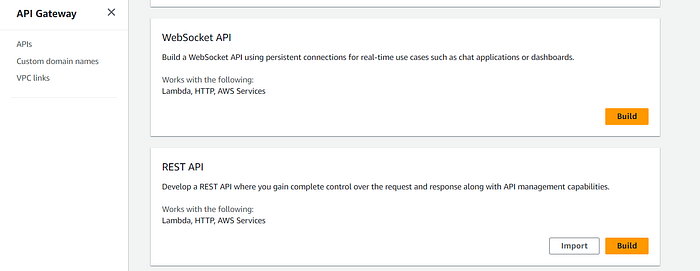
Before routes, let's first take a look at this page. This page appears at first when you have selected WebSocket API.
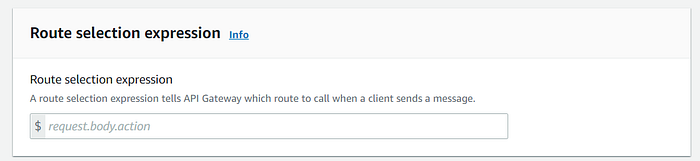
Here, just fill the same: request.body.action. We are just specifying the path of action here. I will clarify this later.
Now, we have the next page here.

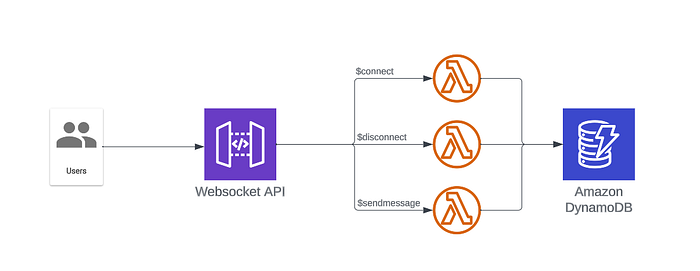
Routes here are simply like a bridge to connections. As you can see, there is a $connect route, $disconnect route and the custom route that I have added called sendmessage. So, when a connection is established, the $connect will trigger. Similarly, when you disconnect from a websocket, the $disconnect route will trigger. I will explain why do we need these routes (or triggers) in a moment. Click on those Add $.. route buttons to add desired routes and go to the next page.
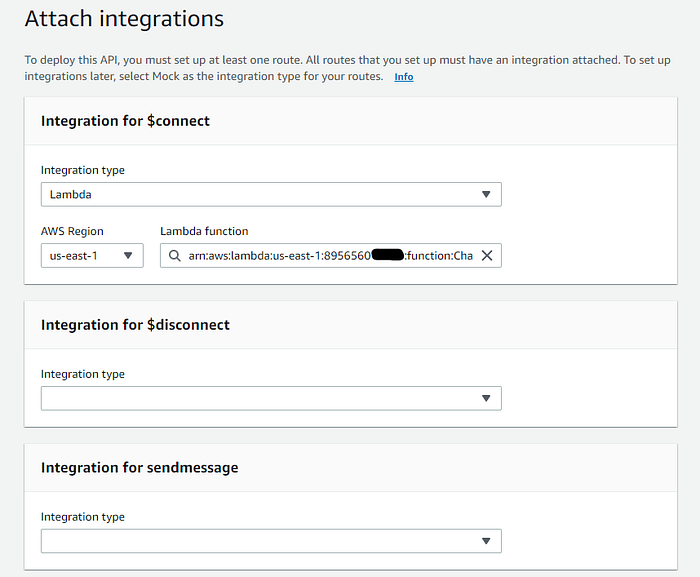
Every route should have an integration. There are 3 types — Mock, HTTP and Lambda. Here, I used a lambda function as an Integration type to my $connect route.
So the flow is like:- onopen() will call the $connect route which in turn will trigger the lambda associated.
Lambda codes
This is a simple lambda code for $connect
exports.handler = async (event) => {
  console.log(event);
  const connectionId = event.requestContext.connectionId;
  const userId = event.queryStringParameters.userId;

  return { statusCode: 200, body: "Connected." };
};
When a user connects to a websocket, a unique connectionId is created for every connection. From the above code, you can see that we can get the connectionId from the event object.
Only connectionId is of no use. We also need to know which user the connectionId belongs to. For that, we can send userId from the frontend as a query string parameter of websocket url : wss://aaaaaa.execute-api.us-east-1.amazonaws.com/{stage}?userId=${userId}
The main usage of connectionId is that it is necessary for sending messages. If I want to send a message to a User, I need to know his connectionId.
Now it depends on what you can do with the info. It's a lambda function. You can store it in Dynamodb or write code based on your application needs.
In a similar way when the user disconnects, the $disconnect route will trigger which in turn will run the lambda associated with it. Here you can write logic to delete the connectionId that you have stored. Think of these lambdas as utility functions.
SendMessage Lambda
At first, we got the Route selection expression page, right? There we have given this: request.body.action. This is used when we have custom-defined routes. We have created a route called sendmessage. We can trigger this route from frontend. Example,
const handleSend = () => {
    const payload = {
      action: "sendmessage",
      content: "Hello wolrd",
    };
    if (webSocket && webSocket.readyState === WebSocket.OPEN) {
      webSocket.send(JSON.stringify(payload));
    } else {
      toast.error("WebSocket disconnected");
    }
  };
To send messages to websocket, we use send() method of websocket. Here, in payload you can see property action. This is necessary for you to call routes. In above code snippet, we are calling sendmessage route, which intern will trigger sendMessage lambda which you should have given in Route Integration.
This is an example of sendMessage lambda.
import {
  ApiGatewayManagementApiClient,
  PostToConnectionCommand,
} from "@aws-sdk/client-apigatewaymanagementapi";

const apiClient = new ApiGatewayManagementApiClient({
  endpoint: "https://<api-id>.execute-api.us-east-1.amazonaws.com/{stage}",
});

exports.handler = async (event) => {
  const body = JSON.parse(event.body);

  const { action, content } = body;

  // .. you can write code as per your requirements with above gathered data
  // .. example, storing content in database etc

  const postDataTemplate = {
    Data: JSON.stringify({
      content: content,
    }),
  };

   const postData = {
      ...postDataTemplate,
      ConnectionId: ..., // ppaste desired connectionId
    };
    await apiClient.send(new PostToConnectionCommand(postData));

  return { statusCode: 200, body: "Message sent." };
};
To send a message to a User, we need his connectionId. Remember, a user will have a connectionId when he is online or in this case, he is on a desired webpage in your app where you have written the frontend websocket logic.
Utilising this package ApiGatewayManagementApiClient, we can send message to a particular connectionId. We can send messages to a connectionId. You need to write logic on how to get connectionIds of particular user. Generally, you will have a database with userId and connectionId columns. Based on that, you fetch the desired connectionId and send the message to it. Then the user associated with that connectionId receives the message in realtime.
Basic flow steps are:-
- UserA sends messages through websocket. In payload he can send UserB id.
- You can fetch UserB connectionId in lambda and pass the UserA message to UserB
- UserB can receive this message in onmessage() method in frontend.
onmessage() is the method which receives messages from websocket in frontend.
And that's it. I have covered all the necessary information needed. I think I have given some high-level explanation and I also included some frontend code.
Final Note
I hope you’ve enjoyed reading my articles as much as I’ve enjoyed creating them. If you find value in what I do and would like to support my writing journey, please consider making a small donation on my Buy Me a Coffee page.